Thursday, May 01, 2014

LIVING ROOM PROGRESS

In my last living room progress post, I shared our fireplace makeover with you! That labor-of-love project made such a huge difference in the space. From the beginning, this room has been deemed the most "dingy" room in the house and needed the most paint work BUT it was also the room with the most character. Although we knew we had a lot to do, and still have a lot left! Jon and I are SO excited to see this room complete. It already feels SO different from when we first moved in!


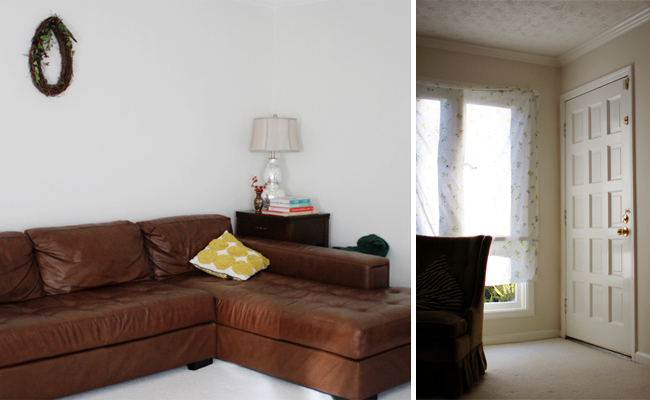
The above photos are from the home listing.

So, our next major project for this room after the fireplace was to paint ALL of the wood trim, doors and windows. We also wanted to replace door knobs, light switches and outlet plates since we had a variety of gold, black, brown and beige going on before. ;) Not cute.

Since having a baby makes projects a little more tricky to knock out in a few full days, we spread this project over a couple weekends. Here is a little list of what we did to the space:

* Caulk and spackle everything. There were so many cracks between the walls, trim and windows, it made everything look so sloppy. After spending almost a day working on this it made a huge difference!

* Prime, prime, prime! We had to do two coats of primer on all of the trim, with very careful attention to the wall of windows. We used Kilz Primer and it worked really well! This is the same primer we used for the fireplace.

* After spending a lot of time priming, we put two coats of semi-gloss bright white paint over all of the trim, windows, and doors. We decided to do two coats just to make sure we got everything and that there would be absolutely no wood showing through. We also figured that if we were going to take on this major project that we would do our best to do it right! ;)

* And finally, we prepped everything and painted the walls a beautiful grey color to really make that trim pop. We were very much done with the dingy green tone that was in there previously.

We are SO pleased with the final results! We still have a lot of work to do in this space, but the major project is done! We have so many excited plans for our home this year and I can hardly wait to share them with you. :)


LEFT TO DO IN THE LIVING ROOM
* Replace the odd patch of carpet with something new, and get rid of the scary transition strip, or "toe ripper" as I like to call it.
* Paint the built-in with a fresh coat of white paint and possibly paint the backing a different color.
* Purchase some furniture pieces and get this room decorated!
* Mount TV.
* Hang some beautiful pictures.
* Replace the "boob" light on the ceiling beam.

Thursday, December 12, 2013

PROJECT HOME: FIREPLACE MAKEOVER

One of the big projects we really wanted to accomplish soon after moving into our home was giving the fireplace a little make-over. This is one of our favorite rooms in the house. It has an amazing amount of windows and we loved that the fireplace took up a huge portion of the wall. Our vision for this room is a bright and cozy place to host friends, watch movies, and have great conversations. There are a lot of dated features about this room, but I love the bones and its character. We have a lot of plans to really update this space and make it our own. First project?? The fireplace! We knew this would make an immediate impact on the space and that we could build around it afterward. Here is a before picture of the living room and fireplace that was used as one of the listing photos:


How We Updated Our Fireplace:
1// Hardware - We took off all of the old hardware on the fireplace. This included the brass cover and yellow-ish sconces. We also made sure to remove any nails and hooks from the brick.

2// Clean - We spent about an hour or so vacuuming the heck out of the fireplace before painting it. One tricky thing about painting fireplaces is that you can tend to have grease spots that will show through the paint as yellowy patches. Right around where the fire will be I might suggest taking some soap and water to the brick to break up any grease. We didn't paint the inside part of the fireplace, but if you do, you'll want to super clean and scrub that space before painting. You also won't be able to use it as a "fireplace" if you paint that area, unless the paint is specifically created for a fireplace and heated environments. 

3// Prep - We used blue masking tape to prep the areas around the fireplace. Since we are planning to also paint the trim and rest of the room we didn't mind if it wasn't perfect but we especially wanted to protect the floors and the wood mantel. We used trash bags to protect the mantel which I would suggest because paint ended up getting everywhere!


4// Prime! - This is a SUPER important step. Since brick is SO porous, it will take a lot of paint. Having an amazing coat of primer on your fireplace will make the final paint job go on smoothly and beautifully. Lets be real, priming this bad boy was a labor of love and took many, many hours. My suggestion would be to spread this project over two days. It took me nearly 6 hours to do one coat of primer and completely cover the entire fireplace. We used an entire gallon of Kilz paint primer for one coat. Kilz is AMAZING. Even though it took a really long time to cover everything, we only needed one coat of this stuff. Again, for this fireplace size, it took an entire gallon. I also went over a few grease patches a couple times to get rid of any yellow showing through the primer. So, onto the process...first I took a roller and did a basic cover over the top of the bricks with the primer. The roller brush didn't cover much because the grout on our fireplace is a little deep so it only got the fronts of the brick. Make sure you pick up a roller brush that's meant for a more porous surface. Then I took a brush and worked on filling in as much of the grout as possible. Because paint brushes are a little large, there were still some spaces and pores I couldn't quite get to. After a lot of time with the brush, I moved onto a small paint brush that you would use for painting canvas and art projects. This really took a lot of time because I wanted to get into every nook and cranny and make sure I did a complete cover with the primer. I would highly recommend watching a show while doing this! It makes the whole process a lot more enjoyable. ;) But take your time, make sure you do a full coverage of primer. It will be totally worth it if you do! 

5// Paint - After doing one, complete coat of primer and using an entire gallon of paint, we let the space dry. Once dried, we used a Valspar semi-gloss paint & primer in bright white. The semi-gloss was perfect and really added a beautiful shine to the fireplace. It also made the fireplace feel smooth and clean. We love how it looks in person! Since we worked so hard on the primer coat, it only took one easy coat of paint to finish off the fireplace. Again, we used the roller first and then used a larger paint brush to finish up the rest. It only took about an hour to do the final paint portion of the fireplace. 


And you're done!! It was definitely a time consuming project but it made a huge impact in our space and really updated the look. We also decided to update the lighting and Jon picked out these lantern style sconces at Lowe's which look beautiful up against the white. I'm still trying to figure out if I want to leave the mantel wood or paint it white...or black...I can't decide quite yet. I might do the rest of the room first and then decide. ;)

We are planning to paint all of the wood trim white and paint the walls a really beautiful light blue color to make all of the white really pop! I can't wait to see how this room progresses over time! 

Tuesday, May 21, 2013

PROJECT CONDO: NEW COFFEE TABLE!

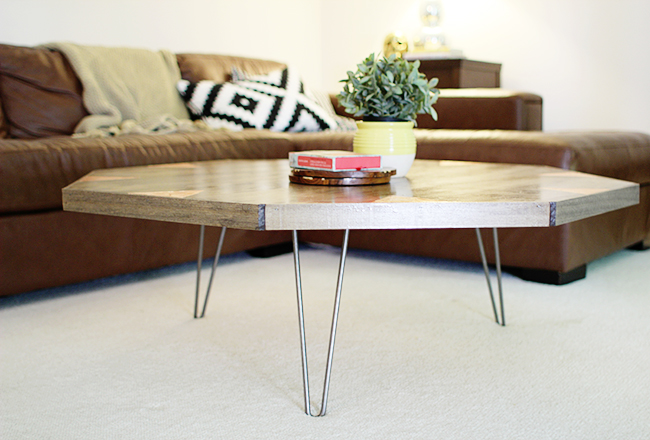
Progress has been made! I commissioned Drew, Jenny's husband, to build a coffee table for our living room. I knew I wanted something round-ish, interesting, and big enough to be used for multiple purposes. It needed to offset the massiveness of our couch and it couldn't be small and dinky by any means. Drew and Jenny came up with a couple different design ideas and we finally settled on an octagonal shape. To add a little extra interest, I asked Jenny to put in some metallic leafing.

They brought the table over this past weekend to reveal it to me and I loved it! It was so exciting to see something I dreamed up in my head translated and then executed into something truly beautiful and special. Drew is a very talented craftsman and Jenny is so fantastic at helping make my thoughts a reality. I love the industrial look of the hairpin legs, the touch of copper leafing and the unique shape. It's also big enough to sit around and eat a meal at, or play games, which is perfect!


Little by little this space is coming together and I'm SO thrilled. Matter of fact, Jenny and I were planning out the rest of the space yesterday. We've got something big in mind for that wall behind the couch...I can't wait to reveal what we've been scheming!!!

Friday, April 05, 2013

PROJECT CONDO: CURTAINS!

For the past couple months we've been keeping our living room shielded from outside viewers with mix-matched bedsheets. Although they certainly served their purpose, the fitted black bed sheet and white floral sheet had to go. You can see a couple shots of the living room with said sheets for curtains here. ;)

About a week ago I was perusing the UO site and came across a beautifully patterned pair of curtains on clearance sale. I happened to be sitting in my living room at the time, so I did a little look-see around the room to see if it would go and if they would flow well with the dining room. I ended up buying them, they came in the mail a couple days ago and Jon helped me hang them up. I am blown away at what a difference a few panels of curtains can make to a room. I initially wouldn't go for such a bold patterned curtain, but I love the neutral coloring and this particular pattern design.


It ended up becoming a great statement piece for the room and one of the first things you see when you walk into the front door. (The door in the picture leads our to our back patio, the front door is down a long hallway opposite the fireplace) We bought them super long and hung them as high as possible to give the room a lot of visual height. I'm so excited about this mini progress! I've got some more decorating brewing for the living room that I can't wait to share soon. :) 

Happy weekend!! 

Thursday, March 28, 2013

PROJECT CONDO: LIVING ROOM INSPIRATION BOARD

I've been getting the decorating fever. This doesn't happen all the time so I try to take full advantage of it when I can. I sat down the other day in my living room and spent some quality time sketching out my ideas, thinking through everything, and coming up with a plan for the look of the space. I'm really excited about the direction it's taking and I'm looking forward to applying my learning from the dining room to this space. Here is an inspiration board that represents an overall look I'm going for, neutral/metallic colors, patterns, and little details:


I really love the neutrals and the addition of the metallics. I'm not afraid to mix and match colors that wouldn't normally go together. I kinda love the simple, cozy feel it gives off. If I decide to change my mind about colors, I can always re-adjust my textiles. I think pops of statement colors are beautiful and I'm still trying to figure out what that color will be for this space. I've thought about peach and blue, but I'm not sure yet. :) I'm also still on the fence about the pattern I want for my wallpaper wall and if I'm going to paint the fireplace white. I think those pieces might be added/decided later. :)

Today I'm planning on finally hanging our curtains! When we first moved in, we left the windows uncovered. We face a wooded area, but over time got a little creeped out about being a fishbowl and so we decided to nail sheets to the windows. ;) My curtains came in yesterday and I can't wait to get them up! These are the first "patterned" curtains that I've really loved. I think they will flow well from the dining room, too. Progress!

1// White Fireplace 2// Triangle Curtains 3// Chair 4// Pillow 5// Skull 6// Cowhide Rug 7// Living Room 8// Magazine Holder 9// Living Room 10// Camel Couch 

See my living room Pinterest board here!


Wednesday, March 13, 2013

PROJECT CONDO: WALLPAPER, FRIEND OR FOE?

I'm SO excited that Jenny and her husband are starting on a couple of pieces for me for the living room. I've been pondering this space way too long and it's time to get started! One of the big "I'm not sure what to do" elements of this space is the gigantic wall to the left of our fireplace. I've thought about painting it to make it an accent wall...but I'm thinking that might be too plain, especially since most of the furniture and decorations in this space will most likely be neutral. I've thought about stenciling it with paint...but I think there's way too much room for error, especially for me! The thought I keep coming to over and over again is to use a bold wallpaper and make it into a statement piece. I'm leaning more and more towards this idea. I mean how hard can wallpapering one wall be? She said to herself as flashes of not matching up the pattern and running out before finishing cloud her mind. I think I might have to enlist a little help from someone who has experience in this area!

So, if we ARE indeed leaning towards wallpaper, my next trick is to find some awesome wallpaper that isn't blow-your-mind expensive, in a pattern that I actually like. I've been scooping out Pinterest and a few stores and have found some patterns I like but are a little on the pricey end for my budget. Here are some of my favorites:


The first two are from Anthropologie. I really LOVE the birch tree paper but it's nearly $200 per roll and I think I would need 2-3 to do the entire wall, which is ALOT. Overall, I think I'm really drawn to the metallic gold wallpaper choices. I love some glam in my decor and I think the dining/living room area could benefit from a little extra pizazz. The bottom three wallpapers are from Hygge & West which is less expensive but still a wee bit pricey.

And just for some context...here is a before picture of the wall I would like to put it on. It's pretty large...and most likely the TV will also be on this wall, possibly mounted. Also note: the couch is the only thing that will be staying, everything else won't be in the living room. If that helps you imagine it. ;)
So, I need something that goes beautifully with my beloved caramel leather couch and will essentially be the "superstar" of the room. I'd love to hear your thoughts and suggestions. If you have any advice for putting up wallpaper successfully, I would also LOVE to know your tips. As well, If you have any shops you recommend I check out that have great/affordable wallpaper I would love to know! Have a lovely Wednesday, friends!


Monday, January 21, 2013

PROJECT CONDO: LIVING ROOM BEFORE'S

Now that the home decorating is focused on the living room, I wanted to share some "before" photos to show how things are looking now and have something to compare the progress to. As shown below, the living room is connected to the dining room. It has a door that leads out to the back patio, two large windows and a fireplace. The room was already white when we moved in. It's also got a lot of wall space and great lighting. :)
Here are a few shots of its current state. Aside from the couch, everything currently in the room is a temporary place holder as I figure out how I want to decorate the space. You might also notice the bed sheets we hung in front of the window. ;) Jon and I started feeling like fish in a fishbowl at night so we decided to hang up some sheets for a little more privacy since I'm not sure on what curtains I want yet.

A Couple Things to Figure Out
* Not sure if I want to paint part of this room, wall paper, or leave it white?
* Since it doesn't look like we can hang the TV above the fireplace, I'm trying to figure out an attractive TV solution that is easily viewable from the couch and not awkward looking.
* The walls...there is a lot that can be done with these walls! Not quite sure the direction I want to go in yet. I need to start putting together an inspiration board asap!


Some of the things I love most about this space are the windows, beautiful door from the 70's, and the fireplace. I mentioned wanting to paint the fireplace white here, but I'm still trying to make a final decision on that. I am also a huge fan of our big caramel couch! I need to find other furniture pieces to compliment it and still make it flow well from the dining room space. There you have it! I'm looking forward to making progress in the living area. One step at a time!


Tuesday, January 08, 2013

PROJECT CONDO: AND NOW FOR THE LIVING ROOM

Now that my dining room is complete, it's time to start making plans for the next room on my list. The living room! We already bought our couch a couple months ago, so now it's time to decorate the rest of the space. I've slowly been building an inspiration board, because initially I wasn't very inspired or had much of a direction. As I've been taking my time, more and more pieces are starting to come together and while my vision isn't completely clear, I feel like I have a good direction.

I wanted to start these living room posts with "before" photos of the current space, but I haven't been able to get home before nighttime to take pictures, so that post will be on hold until next week! For now, I want to begin the process of sharing thoughts for one of the main features in the space, the fireplace.

Jon and I were so excited that our new home had a wood burning fireplace. We've already put it to good use this season and I love how much "warmth" it adds to the space. It is definitely a focal point of the whole room so it's important that it stands out and is a statement visually. To get a little perspective, the living room flows directly into the dining room. While I want the styles to flow, I don't want it to be the exact same. How this will be executed?? I'm not quite sure at this point! BUT let's get back to the fireplace. I have a major dilemma, as you will see in pictures soon, it's currently a fairly simple brick fireplace. I'm not a huge fan of the brick coloring. It's a little too pinkish for my taste. SO, I've considered painting it. That may strike panic in some of your hearts, I know it certainly makes me nervous, but I feel like it would add so much to the room. Our couch is caramel leather and we will probably stick with more neutrals when it comes to the other furniture pieces so I don't want the room to feel too heavy or dark. To see what I mean, here are some of the inspiration pictures I keep looking at as I think, "to paint, or not to paint...?"


1// This is probable my favorite photo of the two. I think it's a more realistic example of my current fireplace, and since I would want to still use it, I like having the panel in front of it. I also love how they leaned one big piece of art on top of the fireplace and decorated around it. We have a lot of home related books that could use a good home. I also have a beautiful vintage mirror from Jon's grandmother that would look great as the focal point. I love how the white brightens up the space and how the other pieces make it feel warm.

2// I like this photo mainly for the intensely cool art collage above the fireplace and collection of items beside it. I don't think I'll go the collage route, because I already have a collage in the dining room and I'm not sure it would work quite right with the space...but I could consider a mixture between the two?

So now I just need to make up my mind. Keep it brick OR paint it white?? If you have or know of a great "paint your fireplace white" tutorial, I would love to read it!

Before pictures of the living room coming soon, promise!


Wednesday, October 24, 2012

PROJECT CONDO: CARAMEL COUCH

Remember my rule about focusing on decorating one room at a time? Remember how I kinda broke that rule with this small purchase for the kitchen? Well if the kitchen purchase wasn't considered a "cheat" on my rule, then this most certainly is!

If you've been following my dining room progress posts, we are still about 30% incomplete with some major "decorative" pieces left to tie everything together. So, how did I get off track again? Well, I blame Kate. ;) During a slumber party at Kate's a couple months ago, I immediately fell in love with her big, caramel colored, leather sectional. It was a perfect size, super comfortable, and a color to die for. It was love at first site. Fast forward a couple weeks during a get together at my place and conversation came up about what type of couch I wanted to replace my tattered ikea purchase. Without hesitation, I said, "Something exactly like Kate's couch!". Kate turned to me and said, "Well, I'll sell it to you!". Bam! Agreement made. A couple weeks later, I picked the couch up from Kate's and Kate purchased a new couch for her place.


I love this couch. It's a sectional with a chase lounge and comfortably seats 5-6 people. Jon and I spent the first couple days breaking it in with a marathon of Dr. Who. So, I may have deviated *a little* from my rule, but there was no way I could pass this beauty up. I'll be re-focusing on the dining room since I'm hoping to completely finish it for a Thanksgiving dinner we're hosting for friends in late November. I'll be sure to share more pictures of the living room once the dining room is finished! In the meantime, I need to get my booty into high gear and get my projects done for the dining room!!